Assign KACE Cloud DEP profiles to Apple devices
When you uploaded the MDM server token to KACE Cloud, you linked KACE Cloud to that MDM server. This means KACE Cloud can now see the devices in DEP so that you can configure the DEP profile and control the activation process.
If you just assigned devices to your MDM server in DEP, you probably need to re-sync the information. Although KACE Cloud synchronizes the information each night, you can run it manually at any time by going to Settings > Apple Settings > DEP Enrollment > Apple DEP Enrollments and clicking the Sync button for a desired MDM server. This will read the latest device information from Apple Business Manager so you can use it in the next steps.
The first step in configuring DEP devices in KACE Cloud is to create a DEP profile. DEP profiles control the activation process of the device. A DEP profile MUST be assigned to the device before it is activated, otherwise the device is activated like any normal end-user device, meaning that it is not automatically enrolled in mobile device management, preventing the device from being supervised.
You can have more than one DEP profile if you want to treat certain devices differently than others. Only one profile can be set as the default for a specific MDM server. If you create multiple DEP profiles, you need to manually assign your managed devices to non-default profiles.
To add a DEP profile that is delivered to a device after activation:
- In KACE Cloud, go to Apple Settings > Manage DEP Profiles.
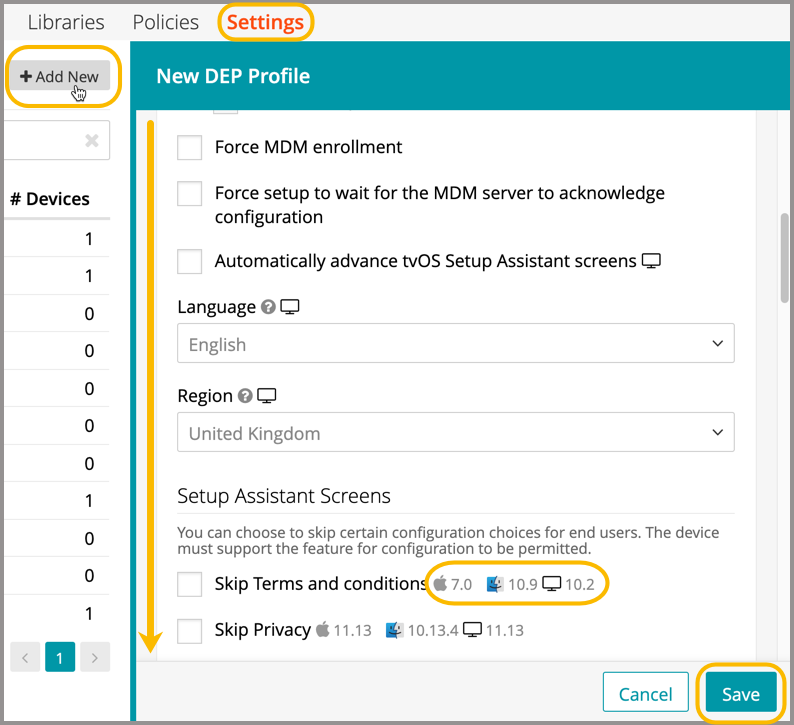
- Click Add New.
- Complete required fields and make selections.
Enter the Profile Name along with your company’s IT Support Phone and Support Email. The Department field is optional and can be used to help you determine which profile to use for a particular group or department in your company.
The next check boxes are the most important. Here’s what we recommend and why:
- Force DEP Authentication: When configuring a device with a DEP profile on a Mac-enabled tenant, an admin can enable this option to force the user to enter their user name and a deployment token to enroll their device. This restriction helps prevent unauthorized access to sensitive customer information like VPNs, certificates, and custom applications.

NOTE: If an iOS device is included in a DEP profile on a Mac-enabled tenant that has Force DEP Authentication enabled, this forces the iOS device(s) to authenticate. Full account authentication, including SSO, is available during the DEP enrollment process. The option eliminates the need for generating authentication tokens for iOS 13+ devices and mac 10.15+ devices.
- Versions earlier than iOS 13 and mac 10.15 only. A token can also be generated using the original enrollment URL. The workflow overview below illustrates the location of token generation and at which stage of enrollment this token is required as a password.
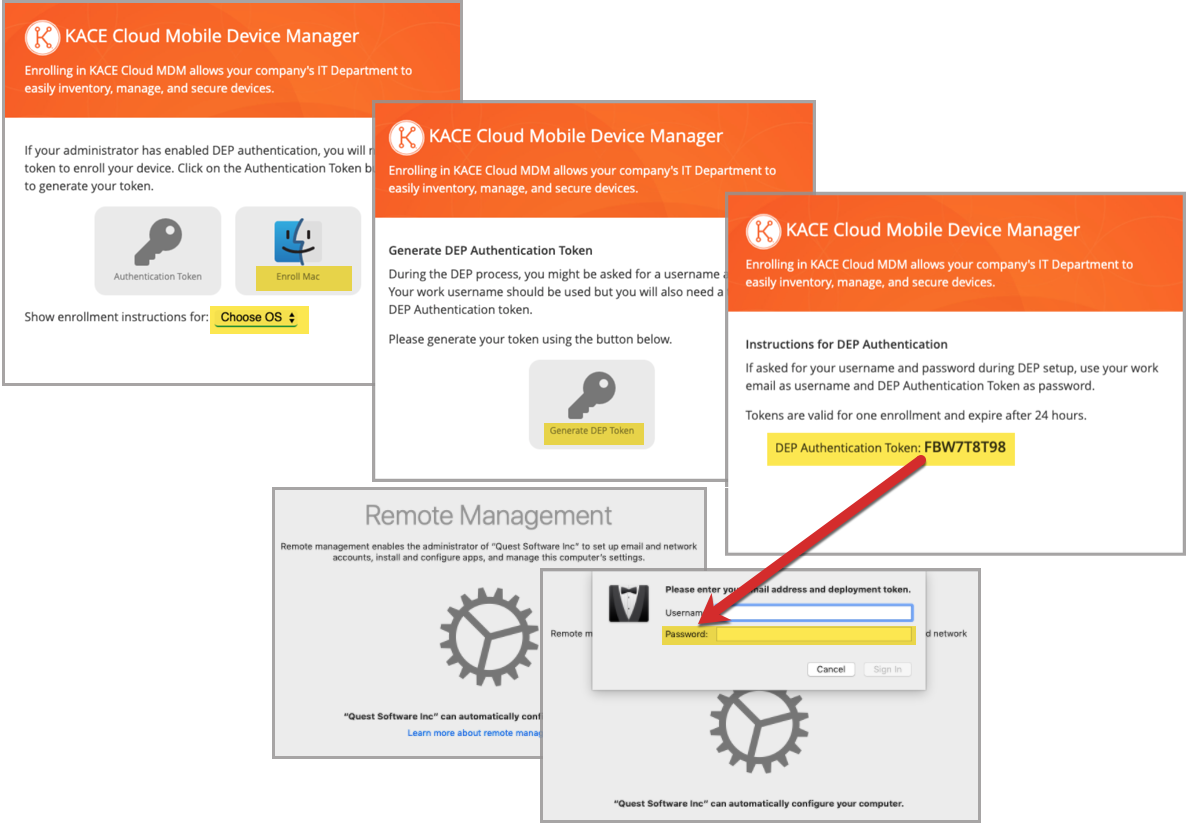
- Versions earlier than iOS 13 and mac 10.15 only. A token can also be generated using the original enrollment URL. The workflow overview below illustrates the location of token generation and at which stage of enrollment this token is required as a password.
- Supervise the device: As a device administrator, you have MUCH greater control over a supervised device than a non-supervised device. It includes the ability to silently install configuration profiles and enforce additional restrictions. Support for unsupervised DEP devices has been deprecated starting with iOS 11, and from iOS 13 onward, all DEP-enrolled iOS devices are automatically supervised. Select any of these options.
- Allow supervised pairing: Selecting this option allows the device to be paired to a local computer.
- If this box is checked, the supervised device is detectable and manageable by any computer, including those without a matching supervision identity. This allows tools like Apple Configurator to modify or reset the device.
- If unchecked, the device will only pair with computers that have the matching supervision identity installed—provided the identity was deployed during enrollment. This enhances security by preventing unauthorized access or configuration changes. This is deprecated since iOS 13.
- Allow MDM profile to be removed: Unless you do not mind losing corporate assets, you probably want to keep them under management, which means you do not want end users to be able to remove the MDM management profile from the device. Leave this check box clear to prevent the end user from removing the profile.
- Allow supervised pairing: Selecting this option allows the device to be paired to a local computer.
- Force MDM Enrollment: Selecting this option forces the device to automatically enroll with KACE Cloud. If left clear, the user still has the option to enroll, but they can skip it if they do not.
- Force setup to wait for the MDM server to acknowledge configuration: In most cases it is better to wait a few seconds on the enrollment screen and know that it was successfully enrolled rather than allow the end user to proceed with setting up the device just to have to redo it if the network dropped out unexpectedly.
The rest of the check boxes are purely about your preferences. Apple devices have a series of screens that are displayed to the end user during the activation process, and you can choose which of those screens to allow and which to suppress. For many of the options, it's not just about skipping the option, but deactivating the functionality on the device. For example, if you skip Apple ID, the user won't be able to sign in with Apple ID on the device at all.
When done, click Save.
- Force DEP Authentication: When configuring a device with a DEP profile on a Mac-enabled tenant, an admin can enable this option to force the user to enter their user name and a deployment token to enroll their device. This restriction helps prevent unauthorized access to sensitive customer information like VPNs, certificates, and custom applications.
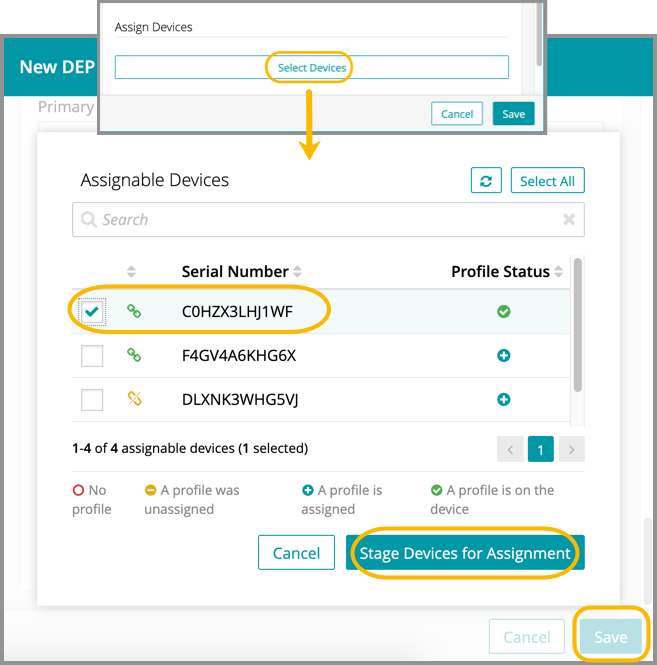
- Assign devices to a new profile:
- Click Select Devices.
- Select one or more devices from the list.
- Click Stage Devices for Assignment.
- Click Save.

Caution: Devices purchased outside of an official channel may still be assigned to the DEP portal using the Apple Configurator 2 app on Mac, provided the devices are iOS 11 or later. For information on this process, please refer to Apple Configurator 2 Help.