Create and edit reports
|
|
NOTE: We’ve upgraded the reporting system to offer better clarity and flexibility. If a report doesn’t load or shows an error, it’s likely due to these recent enhancements. |

The report editor allows you to quickly select the data that you want to display in a report. The left-hand pane contains a set of intuitive tiles that you can use to easily specify the data that you want to display in the report. Start by selecting the entity set on which you want to report, such as apps, devices, users, or operating systems. Next, review the default columns included with the selected entity, and make any changes, as necessary. You can also use a custom query to select specific elements, as needed. For more information, see Understanding the query syntax. As a last step, you specify one or more columns that you want to use for sorting the data in the report, and the order in which the sorting is applied.
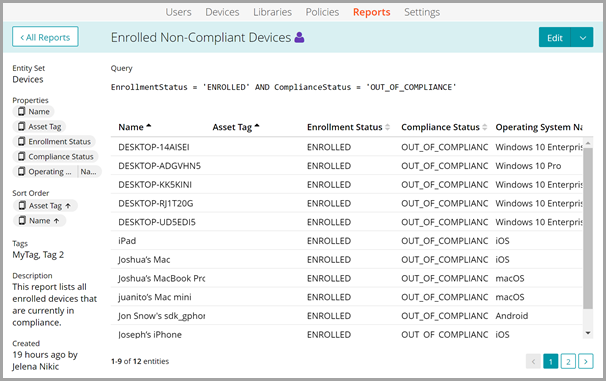
For example, you can create a report that lists all enrolled devices that are currently out of compliance.
To create or edit a report:
- Complete one of the following steps:
- To create a new report, on the Reports tab, in the top-right corner, click Add New.
- To edit an existing report, on the Reports tab, locate and click the tile of the report that you want to edit. Next, in the report view that appears, in the top-right corner, click Edit.
For more information about finding a desired report on the Reports tab, see Manage reports.
- Specify the entity set that you want to focus on in your report. In the left-hand pane, click Entity Set, and select one of the following options: Apps, Device Policy Configurations, Devices, Labels, Operating Systems, Patch Results, Patch Catalog, Policies, Subscriptions, or Users. For details, see Reporting entity sets.
The Properties tile in the left-hand pane refreshes, showing the default data elements associated with the selected entity set. The main report area displays the columns associated each ot these properties. For example, if you selected the Devices entity set, the following columns appear in the report: Name, Asset Tag, Enrollment Status, Compliance Status, and Operating System Name. The Properties tile becomes populated with common properties associated with the selected entity set.
- To add or remove the columns from the report, use the Properties tile.
- To add a column to the report, in the Properties tile, click the area marked with Add Property, and select an item in the list, as applicable.
Your report can include columns associated with other entity sets, it is not limited to the selected entity. For example, if you selected the Devices entity set, you can display the operating system name and version of each device, that come from the Operating System entity set. All applicable properties are available for selection in the Properties tile.
When you select the Devices entity set, the property picker can also include a Custom Fields group. Each custom field appears as a selectable property and can be added as its own column in the report.
Alternatively, if you know the property name, start typing it, and then select it from the choices that appear as you type.
- To remove a column, simply click the right-most Remove icon on the property entry.
- To change the order of columns in the report, drag the property elements into desired position.

NOTE: For custom fields that use multi-select lists, a device can appear in multiple report rows when one or more of those fields are selected as report columns.
If a device has no value for a selected custom field, the related report cell is blank.
- To add a column to the report, in the Properties tile, click the area marked with Add Property, and select an item in the list, as applicable.
- To sort the report rows, use the Sort Order tile. You can sort the report on one or more columns, as needed.
- To specify the column on which you want to sort the report contents, in the Sort Order tile, click the area marked with Add Property, and select an item in the list, as applicable.
- Add more columns, as needed.
You can sort the report using any property that is associated with the selected entity, not just those that are included in the report.
Custom field columns are sorted by each field's data type (for example, numbers as numbers and dates as dates).
- To change the order of columns on which the report data is sorted, drag the property elements into desired position.
- To toggle the sort order from Ascending to Descending or the other way around, on the property element, click the arrow icon.
You can also use the column headers in the report to sort the data.
- In the Name field, type the report name. The information you enter in this field can be used when searching for reports on the main Reports page.
- To tag the report, use the Tags field.
You can specify multiple tags, separated by commas. Any tags associated with reports appear on the main Reports page, and you can use them to quickly access a specific report.
- In the Description field, provide a brief description of the report. Like the Name field, the information you provide here can be used when searching for reports on the main Reports page.
-
Optional. Use the Query field above the report to only display specific data elements in the report. This field offers the available options and operators as you type, allowing you to select an applicable term from a list that appears. If your query is valid, a green check mark icon appears on the right. A red icon indicates a syntax error.
In device reports, custom fields can be referenced in filters by using the CustomFields.<field_name> pattern, for example: CustomFields.Department = 'Engineering'. If a field name contains spaces or special characters, use bracket notation such as CustomFields['Foo Bar']. If the field name contains an apostrophe, escape it with a backslash, for example: CustomFields['Manager\'s Region'].
For information about the query syntax, see Understanding the query syntax.
- In the top-right corner, click Save Changes.